Over the past few months, I’ve started to use Notion for my digital organisation. Whilst I like to think that I’m quite organised and tidy, I must admit my digital organisation is not up to scratch. On discovering Notion I fully immersed myself in tutorials, articles and using different templates to find a set up that works for me. Since October I’ve been using this tool on a daily basis to monitor and track my tasks, projects, fitness as well as to save documents and articles.
One of the key reasons for using Notion is the amount of flexibility it offers. Used along with web clipping tools and expert tips from Marie Poulin and Maria Aldrey, it is possible to integrate your digital resources all in one place instead of across several apps.
Getting started, I followed all of Marie Poulin’s videos and templates but have now established a workspace that works for me. I’d definitely recommend checking out Notion Office Hours, Marie Poulin’s YouTube channel, Maria Aldrey’s GroovyWink as well as the PARA method from Tiago Forte as a digital organisation system.
In this tutorial I’d like to share with you how I set up my work dashboard to track daily tasks, weekly progress and meetings and hope you can make use of the template and integrate some of the tips into your own workspaces!
Basic Work Dashboard (with Template)
1. Getting Started with Notion
Once you sign up for a free account at https://www.notion.so/, create a new workspace with Add a Page.
Give your new workspace a name and we’re ready to go!
2. Setting up the template
The dashboard will be made of several elements:
- Daily Planning database
- Quick Access section
- Good Morning workflow
- Weekly Focus section
You can duplicate the template and work straight from there or in the following steps I will go through how to create each section.
3. Creating a Daily Planning Table
Whilst in many of the resources linked above work from Task databases so that these can be shared with other members of a team (see Advanced Dashboard), I found that I like to see my meetings, tasks and weekly schedule from within one database.
I treat this table as time slots in a daily planner and create different views to see my daily or weekly schedule.
3.1 Create a table
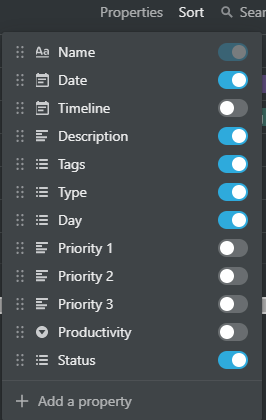
Create a new page within your empty dashboard and select Database > Table. This sets up a basic table for you, with a few fields already created. Give your table a name eg. Daily Planning, and add the following properties:
- Name
- Date
- Timeline
- Description
- Tags - configure options of
Weekly Review,Task,Meeting,Recurring - Type - configure options specific to your tasks eg.
Admin,Content,Coding - Day - configure options with the days of the week, as well as
WeeklyandSomeday
💡It is useful to index each item with a number to get the order to appear correctly in the kanban board, as shown later - Priority 1
- Priority 2
- Priority 3
- Productivity - configure options of 1–5 stars
- Status - configure options such as
Not Started,On Hold,In Progress,Complete
You might notice that there are two fields containing dates; date and timeline. For me, there are tasks I may be waiting on or may take several days to complete. To ensure that task appears in Today's Tasks kanban board the date field needs to be the latest date and the timeline the duration that the task has been active for. This is still a work in progress and I’m open to ideas to make this easier!
 Properties
Also there are some fields that are used exclusively for Weekly Reviews such as Priority and Productivity and have created a template for Weekly Reviews with preset values for some of the properties. You can create templates by clicking the arrow next to the blue New button and selecting New Template. I also have set up templates for New Tasks and New Meetings again with some fields populated.
3.2 Views
At the moment our database looks like a table however, it is possible to add more views (by selecting Add new View) to help make organisation easier!
- Default View: Table, as created
- Today Kanban: Kanban* with
Filter on Date is todayandgroup by Status - Weekly Kanban: Kanban
sorted by Date descendingandgroup by Day - Weekly Reviews: Gallery with
Filter on Tags contains Weekly Reviewandsorted by Date descending
You can change the properties to be displayed on the cards to show priorities - Calendar: Calendar
by Date - Not Complete: Table with
Filter on Status not complete,Filter on tags does not contain Meeting,Filter on tags does not contain Weekly Review
*Kanban refers to a style of project management where tasks are displayed in columns on a board
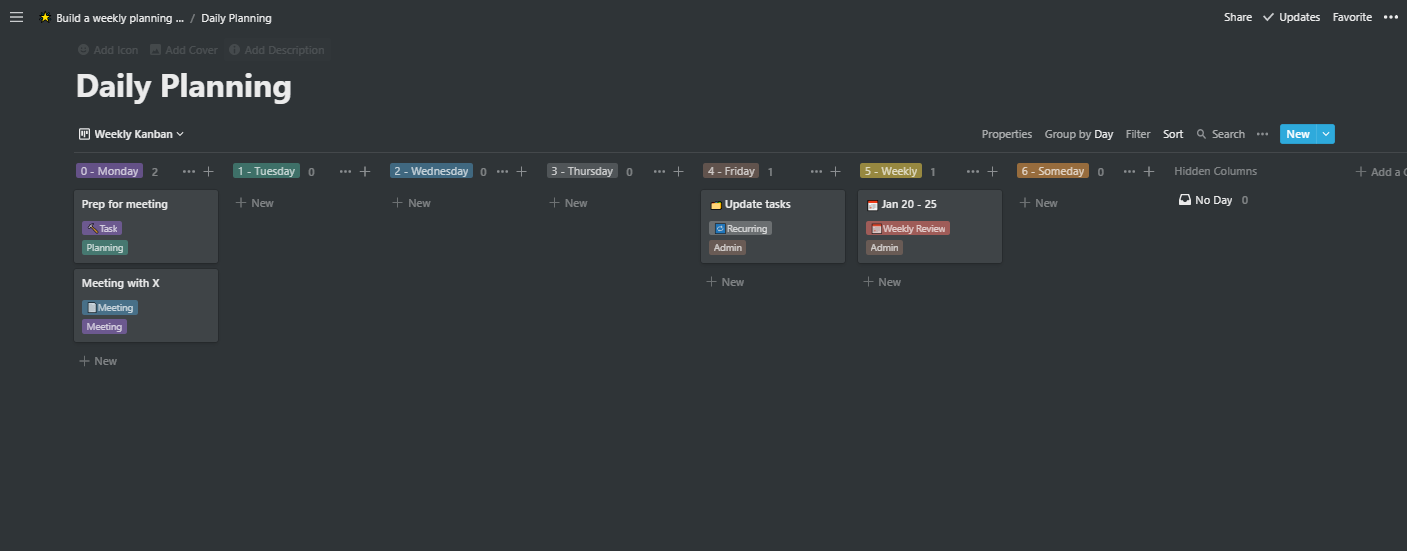
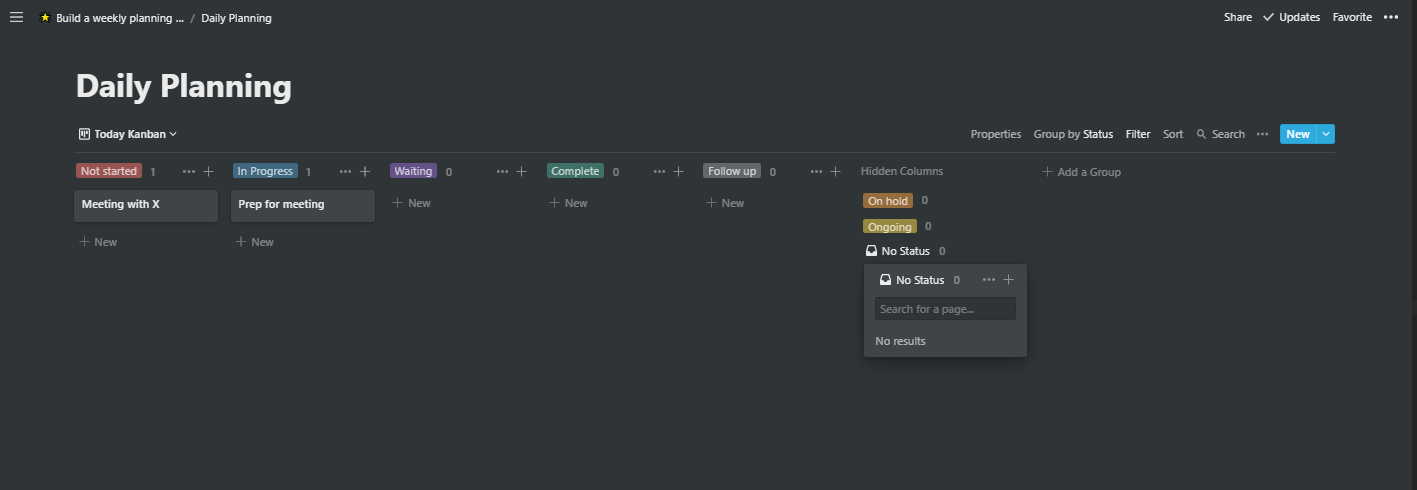 Weekly Kanban (L) and Today Kanban (R) views
3.3 Recurring tasks
Notion currently doesn’t have the capability to handle recurring tasks. To deal with this in the table, I have added Recurring as a tag and for these tasks specifically do not assign a date field. For the recurring task Update Tasks I have set a Day of Friday since this is a weekly recurring task.
For monthly tasks, you could also configure an option of 7 - Monthly as a Day and change the date to the next day to perform the task once it has been completed each month to ensure it is added to your Today Kanban.
I have been using this set up for around a month now and it is incredibly easy to maintain and I work mostly from within the Weekly kanban, unless I have a particularly busy day. It does rely on updating the tasks at the end of the week to remove the Day property but this can serve as a good reflection on your tasks for the week as you are filling in your Weekly review.
4. Quick Access Bar
There are some documents that I like to have easy access to and I’ve added these to the quick access bar on a different colour background. To create this box, you need to first create a toggle list in this case the list is: ✨✨✨
Within the list you can create some Template Buttons such as a New To-Do or a New Meeting which creates a meeting notes document created from a Notion inbuilt template.
Finally you can create a title of My Documents and add some useful resources here.
 Selecting a background colour for a toggle selection
Once this is all set up, select the three dots next to the start of the toggle and select Color and select a Background Color of choice to make it stand out. Finally, remove the toggle arrow and your quick access bar is ready to go!
5. Good Morning Toggle
Again using a Toggle List you can create a drop down to-do list of tasks to check off Daily and Weekly, you can set this up with your own motivational quotes and checklists.
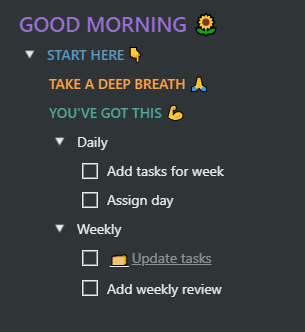 Good Morning checklist
To get this to align with the Quick Access bar, you can highlight the section and drag the block to the end of the row where two columns will then be created. I have also added a blank line to create a 3rd column where I have adjusted the spacing.
6. Weekly Focus
Firstly create the heading of Weekly Focus and underneath this create another toggle list, this time without a title.
 Weekly Focus block
Inside the toggle create a placeholder text such as Focus 1 and change the background colour. Duplicate this toggle list depending on how many focus points you want each week.
Again drag each toggle to the end of the row with the Weekly Focus title and add an extra blank line for an extra column at the end, if desired. Adjust the column widths to fit your page.
You can now get started with your own weekly dashboard! If you would prefer to use the template for this dashboard you can access that here and duplicate into your own workspace.
I also have a more advanced template you can try which contains further databases such as Tasks, OKRs & Projects.
This article is also on Medium.

Kerry Parker
Data Engineer with PhD in Physics. Interested in all things data, personal development and productivity, see more posts on Medium.